Ever needed to have a dropdown on a form? Or on a configuration page? Maybe multiple dropdowns for different ends with different types? elm-ui is great, but it doesn’t offer a primitive for dropdowns. In this guide, you’ll build a reusable dropdown and, along the way, you’ll learn about parametrized types.
We’ll build on top of work done in part I, but if you’re familiar with Elm, you should have no trouble jumping right in. The complete code from part I is available in this Github repository.
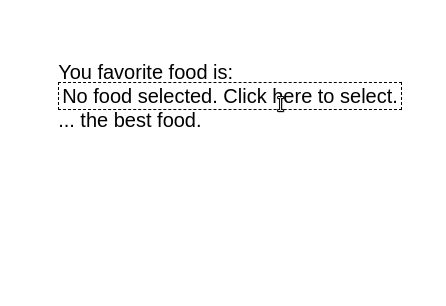
In part I we built this:
The way we did it, we can’t reuse it for other types. We’ll build a simple reusable component with consistent styling that can be reused by calling a function in our views and little added logic.
Here’s a refresher of the view and update logic of what we built in part I:
type alias Model =
    { favoriteFood : Maybe Food
    , status : Status}

type Status
    = Normal
    | SelectFood

view : Model -> Html.Html Msg
view model =
    let
        selectedFoodName =
            case model.favoriteFood of
                Nothing -> "No food selected. Click here to select."
                Just food -> food.name
                dropdown =
            case model.status of
                Normal ->
                    E.el
                        [ Border.width 1
                        , Border.dashed
                        , E.padding 3
                        , Events.onClick ClickedSelectFood
                        ]
                        (E.text selectedFoodName)
                SelectFood ->
                    E.el
                        [ Border.width 1
                        , Border.dashed
                        , E.padding 3
                        , E.below (viewFoodList foodList)
                        ]
                        (E.text selectedFoodName)
    in
    E.layout
        []
        (
        E.column
            [ E.centerX
            , E.centerY
        ]
            [ E.text "You favorite food is:"
            , dropdown
            , E.text "... the best food."
            ]
        )

type Msg
    = NoAction
    | ClickedSelectFood


update : Msg -> Model -> Model
update msg model =
    case msg of
        NoAction ->
            model
        ClickedSelectFood ->
            { model | status = SelectFood }
For a single dropdown this is fine, but if we had, say, 5 dropdowns, we’d need 5 different Status. That is a lot of boilerplate. We’ll create a new Dropdown type to keep the state and value of the dropdown.
Let’s change that. Associated with dropdown is a list of options and a function that will convert an option to a string (to display). We’ll also need a message to trigger when an option is selected.
type Dropdown a
    = Normal (Maybe a)
    | Select
This is a parameterized type. This dropdown can receive any type (foods, countries, people, cars, whatever you need). See that a there? That’s the type variable.
This Normal is in conflict with our previous Status type. Go ahead and delete that entire type. Now, we’ll change the model to reference this dropdown type. we’ll need a Food dropdown - the Food will be the type of the Dropdown.
While we’re at it, change the initial model too.
type alias Model =
    { favoriteFood : Maybe Food
    }

initialModel : Model
initialModel =
    { favoriteFood = Normal Nothing
    }
We also don’t need status anymore. Dropdown will keep its state within the type.
Next, let’s tackle update. Since we don’t have Status anymore, we’ll need to start using the new Dropdown type here too.
update : Msg -> Model -> Model
update msg model =
    case msg of
        NoAction ->
            model

        ClickedSelectFood ->
            { model | favoriteFood = Select }

        ClickedDropdownFood food ->
            { model | favoriteFood = Normal (Just food) }
Let’s head over to the view function now. Go ahead and delete the entire let expression. Delete the viewFood and viewFoodList while you’re at it. We’ll replace these with generic functions. Now, create a dropdownView function.
dropdownView : Dropdown a -> List a -> (a -> String) -> Msg -> (a -> Msg) -> E.Element Msg
dropdownView dropdownState options toString openMenuMsg clickedOptionMsg =
    let
        selectedName =
            case dropdownState of
                Normal (Just someA) -> toString someA
                _ -> "Click to select"
        menu : E.Element Msg
        menu =
            if not (dropdownState == Select) then
                    E.el
                        [ Border.width 1
                        , Border.dashed
                        , E.padding 3
                        , Events.onClick openMenuMsg
                        ]
                        (E.text selectedName)
            else
                let
                    mouseOverColor : E.Color
                    mouseOverColor = E.rgb 0.9 0.9 0.1

                    backgroundColor : E.Color
                    backgroundColor = E.rgb 1 1 1

                    viewOption : a -> E.Element Msg
                    viewOption option =
                        E.el
                            [ E.width E.fill
                            , E.mouseOver [Background.color overColor]
                            , Background.color white
                            , Events.onClick (clickedOptionMsg option)
                            ]
                            (E.text <| toString option)

                    viewOptionList : List a -> E.Element Msg
                    viewOptionList inputOptions =
                        E.column [] <|
                            List.map viewOption inputOptions

                in
                    E.el
                        [ Border.width 1
                        , Border.dashed
                        , E.padding 3
                        , E.below (viewOptionList options)
                        ]
                        (E.text selectedName)
    in
        menu
Let’s go step by step. There are 5 arguments to the function. Yes, that’s a lot. What do they do?
dropdownState: gives the state of the dropdown to draw.options: gives the list of possible options from which the user can select.toString: function to convert the type of the option to a stringopenMenuMsg: the message that will be triggered when the user clicks the dropdown to select an option.clickedOptionMsg: the message that will be triggered when the user selects an option.
We’ll simplify this further, but that will come later. For now, pay attention to the let expression - all the logic resides there. It’s pretty much what we had before in the original view. The viewFood was replaced by viewOption, which now is parameterized on a. Idem for viewFoodList and viewOptionList. All the styling is the same. The big different now is the conditions. We now check whether the dropdown state is on Select (meaning the select menu is open).
On view, we’ll now have the following:
view : Model -> Html.Html Msg
view model =
    E.layout
        []
        (
        E.column
            [ E.centerX
            , E.centerY
        ]
            [ E.text "You favorite food is:"
            , dropdownView model.favoriteFood foodList .name ClickedSelectFood ClickedDropdownFood
            , E.text "... the best food."
            ]
        )
The dropdown state is the favoriteFood in the model. foodList is the list of foods defined in [TODO add link] part I. .name is the function that will be used to convert Food to String. Then we have the two messages triggered by the two relevant events.
And that’s it. We now, once again, have a working dropdown. Lets simplify this further. Let’s have a single message for each dropdown and keep the option list inside the dropdown state.
Further simplification
The first modification is to add the option list to the Select variant of Dropdown.
type Dropdown a
    = Normal (Maybe a)
    | Select (List a)
Then, we just have to follow the compiler error messages and make some changes in update and in the view conditions.
update : Msg -> Model -> Model
update msg model =
    case msg of
        -- ...

        ClickedSelectFood ->
            { model | favoriteFood = Select foodList }

        -- ...


dropdownView : Dropdown a -> (a -> String) -> Msg -> (a -> Msg) -> E.Element Msg
dropdownView dropdownState toString openMenuMsg clickedOptionMsg =
    let
        selectedName =
            case dropdownState of
                Normal (Just someA) -> toString someA
                _ -> "Click to select"

        menu : E.Element Msg
        menu =
            case dropdownState of
                Select options ->
                    let
                        mouseOverColor : E.Color
                        mouseOverColor = E.rgb 0.9 0.9 0.1

                        backgroundColor : E.Color
                        backgroundColor = E.rgb 1 1 1

                        viewOption : a -> E.Element Msg
                        viewOption option =
                            E.el
                                [ E.width E.fill
                                , E.mouseOver [Background.color overColor]
                                , Background.color white
                                , Events.onClick (clickedOptionMsg option)
                                ]
                                (E.text <| toString option)

                        viewOptionList : List a -> E.Element Msg
                        viewOptionList inputOptions =
                            E.column [] <|
                                List.map viewOption inputOptions

                    in
                        E.el
                            [ Border.width 1
                            , Border.dashed
                        , E.padding 3
                        , E.below (viewOptionList options)
                        ]
                        (E.text selectedName)
                _ ->
                    E.el
                        [ Border.width 1
                        , Border.dashed
                        , E.padding 3
                        , Events.onClick openMenuMsg
                        ]
                        (E.text selectedName)
    in
        menu


view : Model -> Html.Html Msg
view model =
    E.layout
        []
        (
        E.column
            [ E.centerX
            , E.centerY
        ]
            [ E.text "You favorite food is:"
            , dropdownView  model.favoriteFood .name ClickedSelectFood ClickedDropdownFood
            , E.text "... the best food."
            ]
        )
The if expression was replaced by a case, since now we needed to get the option list from the dropdown Select variant.
Now, let’s have a single message for each dropdown. We’ll create a new type, specifying the available actions, namely, open the menu and click an option. Afterwards, we’ll just need a message for each dropdown. From there, it’s just following the compiler errors to refactor the rest of the program.
type DropdownAction a
    = OpenList
    | ClickedOption a

type Msg
    = FoodDropdown (DropdownAction Food)
DropdownAction is also parameterized and we now have a single message for our food dropdown, which contains a DropdownAction triggered by user activity. We also got rid of the NoAction message which had been dragging along since the first example of part I.
Next, we’ll change the logic in update.
update : Msg -> Model -> Model
update msg model =
    case msg of
        FoodDropdown action ->
            case action of
                OpenList ->
                    { model | favoriteFood = Select foodList }
                ClickedOption food ->
                    { model | favoriteFood = Normal (Just food) }
Our two previous messages, in essence, are still there, but now they’re just variants of the possible dropdown actions, typified in DropdownAction. This actually makes a lot more sense. If we wanted to add more actions to a dropdown, we wouldn’t have to change this message, just the type and the resulting logic.
The last bit is the view. Since there is very little change, I’ll only cover the few lines that are refactored. First of all, we now only receive one message (which is actually a function that receives a DropdownAction and transforms it in a Msg, since all type variants also double up as functions).
dropdownView : Dropdown a -> (a -> String) -> (DropdownAction a -> Msg) -> E.Element Msg
dropdownView dropdownState toString toMsg =
Afterwards, we need to replace the onClick events by the corresponding DropdownAction messages. First, inside viewOption.
, Events.onClick (toMsg (ClickedOption option))Then, inside the Element that renders the default (closed) dropdown.
, Events.onClick (toMsg OpenList)And there you have it. After around 1500 words (counting code, that’s cheating you say, yes I know, but I still had to write it), we’re exactly where we were in the beginning. Ah… the circle of life.

But now, we can add another dropdown with very little work. Let’s add a favorite car dropdown. We create a Car type, add it to the Model, initialize it in initialModel, create a CarDropdown message, basically copy / paste the logic from the FoodDropdown and finally add two lines in view.
type alias Model =
{ favoriteFood : Dropdown Food
, favoriteCar : Dropdown Car
}
type alias Car = {id : Int, name: String}
type Msg
= FoodDropdown (DropdownAction Food)
| CarDropdown (DropdownAction Car)
update : Msg -> Model -> Model
update msg model =
case msg of
-- ...
CarDropdown action ->
case action of
OpenList ->
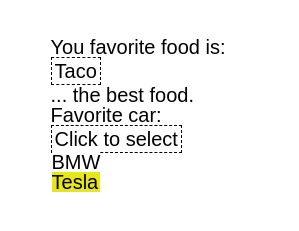
{ model | favoriteCar = Select [Car 0 "BMW", Car 1 "Tesla"] }
ClickedOption car ->
{ model | favoriteCar = Normal (Just car) }
view : Model -> Html.Html Msg
view model =
E.layout
[]
(
E.column
[ E.centerX
, E.centerY
]
[ E.text "You favorite food is:"
, dropdownView model.favoriteFood .name FoodDropdown
, E.text "... the best food."
, E.text "Favorite car:"
, dropdownView model.favoriteCar .name CarDropdown
]
)
We’re done here! A simple, reusable dropdown. If you’ve never used parameterized types, take a moment to ponder their potential and simplicity. We can actually simplify this further depending on the needs, e.g. having a function to update a dropdown based on its inputs. One of the advantages is the consistent style of every dropdown (or the lack of it in these examples). You can check the full code in this Github repository.
In part III, we’ll use the knowledge and practice of parameterized types to make something a little more complex. We’ll build a component that will allow us to choose several options, or none depending on the parameters. It will all be configurable. It will basically be a dropdown on steroids.
What do you think? How would you improve on this? Drop me a message at blog@diogoaos.com.